Socket.IO
- Socket.io实现了房间频道广播等一些基础功能,还有可以实现分路由事件执行,相对来说是一个比较成熟的长连接实现,服务器端有限制,需要是nodejs, 客户端有限制,在微信小游戏等平台需要额外修改类库实现
服务器的代码
1
2
3
4
5
6
7
8
9
10
11
12
13
14
15
16
17
| import socketIo from 'socket.io'
const io = socketIo({
pingTimeout: 1000 * 10,
pingInterval: 1000 * 3,
transports: ['websocket'],
allowUpgrades: false
})
io.on('connection', (socket: socketIo.Socket) => {
console.log(socket.id, '登录到服务器')
socket.emit('hello', {
hello: 'world'
})
})
io.listen(3001)
|
客户端代码
- cocoscreator本身有集成socket.io …
- 直接输出的window.io就是socket.io的对象
1
2
3
4
5
6
7
8
9
10
11
12
13
14
15
16
17
18
19
20
21
22
23
24
25
26
27
| const {ccclass, property} = cc._decorator;
declare let io
@ccclass
export default class Main extends cc.Component {
@property(cc.Node) tipNode: cc.Node = null
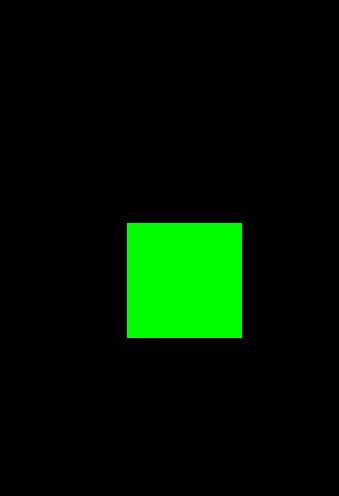
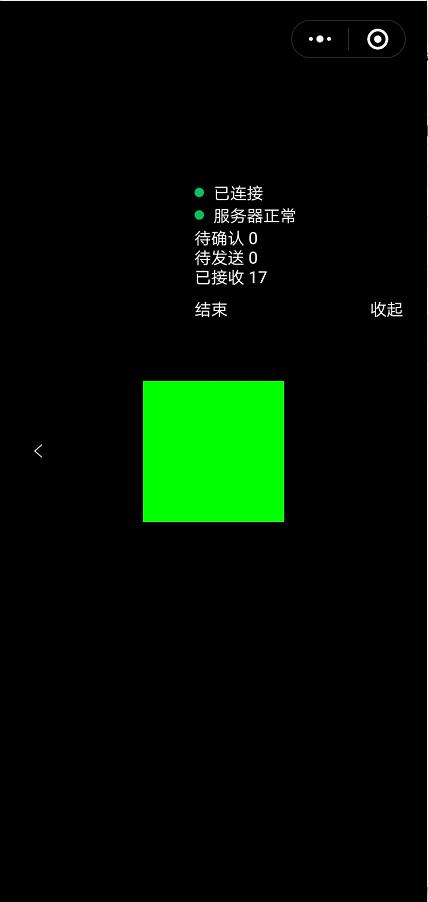
start () {
this.tipNode.color = cc.Color.RED
console.log('io')
console.log(io)
let socket = io.connect('ws://192.168.218.88:3001',
{
transports:['websocket'],
'force new connection' : true
})
socket.on('connect', () => {
console.log(`\n SocketIo Connect`)
this.tipNode.color = cc.Color.GREEN
})
socket.on('hello', d => {
console.log(`\n ${JSON.stringify(d)}`)
})
}
}
|
web端可以直接允许测试
微信小游戏端需要设置
使用微信小游戏下适配的Socket.io
下载地址
https://github.com/10cella/weapp.socket.io
- 在项目目录下新建一个build-templates目录
- 在里面新建一个wechatgame目录
- 新建一个src目录
- 将上面dist里面的weapp.socket.io.js复制到src下
- 在src同级目录新建一个main.js文件
- 内容复制打包小游戏生成的main.js即可
- 在最上层加入如下代码
1
2
| window.io = require('src/weapp.socket.io.js')
...
|
模拟器测试

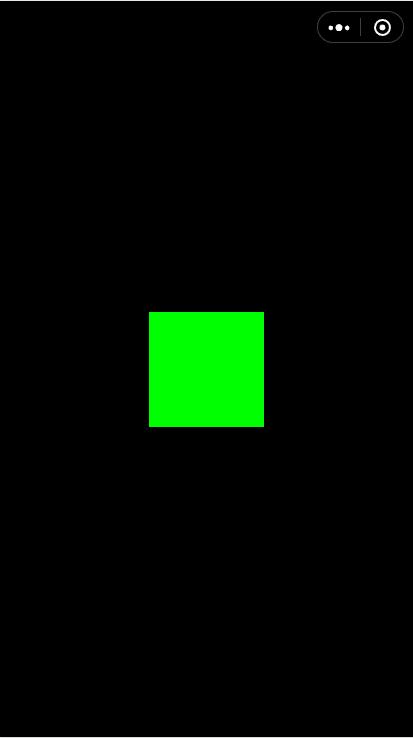
真机测试
Colyseus
- Colyseus实现了以房间为单位的服务器架构,框架实现了一个状态同步的游戏服务器,实现相关的游戏房间的操作,服务器端有限制,需要是nodejs
服务器代码
index.ts
1
2
3
4
5
6
7
8
9
10
11
| import { Server } from "colyseus";
import { createServer } from "http";
import { GameRoom } from "./GameRoom";
const gameServer = new Server({
server: createServer()
});
gameServer.register('game', GameRoom)
gameServer.listen(3000);
|
GameRoom.ts
1
2
3
4
5
6
7
8
| import { Room, Client } from "colyseus";
export class GameRoom extends Room {
onMessage(client: Client, data: any): void {
console.log(client.sessionId, data)
this.send(client, { message: "Hello world!" });
}
}
|
客户端代码
https://github.com/colyseus/colyseus.js/releases
- 将文件加入到目录下
- 使用require的方式导入colyseus
1
2
3
4
5
6
7
8
9
10
11
12
13
14
15
16
17
18
19
| const {ccclass, property} = cc._decorator;
import Colyseus = require('./colyseus')
@ccclass
export default class Main extends cc.Component {
@property(cc.Node) tipNode: cc.Node = null
start () {
this.tipNode.color = cc.Color.RED
console.log('colyseus')
let client = new Colyseus.Client('ws://192.168.218.88:3000');
client.onOpen.add(() => {
this.tipNode.color = cc.Color.GREEN
let room = client.join("game");
});
}
}
|
web端测试
模拟器测试
真机测试
WebSocket
- 长连接相对比较底层的实现,一些心跳包,断线重连等都需要自己实现,对于服务器没有限制,在各个平台基本都有WebScoket的实现
服务器代码
1
2
3
4
5
6
7
8
9
10
11
12
13
14
15
16
17
18
19
20
| import WebSocket from 'ws'
import http = require('http')
const server = http.createServer()
const wss = new WebSocket.Server({
server
})
wss.on('connection', socket => {
socket.on('message', message => {
console.log('message', message)
})
socket.send('hello')
})
server.listen(3002, () => {
console.log('wsServer is on')
})
|
客户端代码
1
2
3
4
5
6
7
8
9
10
11
12
13
14
15
16
17
18
19
20
| const {ccclass, property} = cc._decorator;
@ccclass
export default class Main extends cc.Component {
@property(cc.Node) tipNode: cc.Node = null
start () {
this.tipNode.color = cc.Color.RED
let webSocket = new WebSocket('ws://192.168.218.88:3002')
webSocket.onopen = () => {
this.tipNode.color = cc.Color.GREEN
webSocket.send('hello server')
}
webSocket.onmessage = (message: MessageEvent) => {
console.log('message', message.data)
}
}
}
|
web端测试
模拟器测试
真机测试